|
The Three Little
Pigs
Well, guinea pigs anyway ;p This guide is dedicated to Charis, Cyrene
and Nystul with my deepest appreciation. Their contributions to this article
are most invaluable not only for their countless advice and inspiration
as well as innumerable amount of time in play and testing, but also for
letting me fry and zap, pk and mk them without a mutter. ;-D
General Tips
This and the Cooperation section covers the basics of Ironman, an Ironman
Guide 101 so to speak - Use these tips and play a few games to get the
feel of Ironman. The other sections of this guide will deal with slightly
more advanced topics such as battle formations, specific monsters and
variations on team makeup. Since there are so many variables in the game
of Diablo, take these as hints and tips rather than hard rules. These
tips are written based on the basic Ironman variation of warrior, rogue
and mage combination unless noted otherwise, so make adjustment where
necessary
Pre-game
Because Ironman games are meant to be played in sets if not finishing
it in one sitting (see note), so you should expect to play for at least
3 hours at a time. Maybe the others wouldn't mind just a quickie but you
should state it in the beginning if you do not have the time required.
There's nothing worst than someone leaving the game after a couple of
lvls - having robbed the team much needed exp points and resources.
Note: For example, after the team did a complete clear of the Church you
have the option to save the characters and restart from the Catacombs
at a later time. But it does come with some penalties:
- Any items you cannot carry in your inventory cannot be restored for
the next game, no mule character allowed.
- You would also lose any Blood Pool or Purifying Spring as well as any
unused beneficial shrines you have found on the previous set.
Hotkeys and abbreviations
Change your hotkeys F9 - F12 to communicate quickly. Some messages that
are useful:
I need Heal Other
Stop
Baiting
Run and regroup at the door
Repair items please
Fall back
King Leoric!
Also, it helps to
predefine some abbreviations especially when there are new people in the
group. Some abbreviations we often use are:
HOP - Heal Other Please
Hopper - The person doing the Heal Other
RIP - Repair It Please
CJ - Cracker Jack (crack these barrels)
WTF - Whither came this fiend?! Hehe :)
Join Order
Warrior creates game, rogue joins next, then the mage. Other variations
are possible but the "Shield" hosts game and the character with
the least AC joins last. The join order is important because of the way
monsters choose their targets. Without getting too technical - normally
they will attack the character closest to them - but a choice have to
be made when there are multiple targets in the same range, and the decision
is made based on the join order. The monsters will target the game host
first, then the first to join and so on. Keep in mind that this guide
is written with the assumption of the aforementioned join order.
Shopping
Pool all your gold. Throw all your gold on the ground in front of Gris
upon entering the game. Each player lists all BASIC armor Gris has to
offer. Personally, I prefer to spend the first 250 gold pieces for a Resurrection
scroll then buy the others with the left over. It makes sense since the
craps you buy with the limited amount of gold you would have better replacements
by level 2 or 3. Otherwise, spending that gold on 5 half potions is not
a bad second choice.
| Item |
AC |
Dur |
Cost |
Rags
|
2-6 |
6 |
5 |
Cape
|
1-5 |
12 |
10 |
Cloak
|
3-7
|
18
|
40 |
Robe
|
4-7
|
24 |
75 |
| Cap |
1-3
|
15
|
5 |
| Skull Cap |
2-4
|
20
|
25 |
| Buckler |
1-5
|
16
|
30 |
| Small Shield |
3-8
|
24
|
90 |
When
buying basic items from Gris, it helps to keep in mind that spending more
does not always mean you'll get more. You want to get the highest AC possible
with the least amount of gold. Durability is hardly a problem with a warrior
in the party. If you are lucky you can get up to 14 AC with just 50 gold
pieces. Also, the warrior can sell his club for 5 gold (probably get one
from the first monster killed) and his buckler for 12 gold (if he bought
a better one) if there are other good buys.
Gold
and scrolls
Pick up the gold - The number of items that can lie on the floor is limited.
This will prevent monsters from dropping items if the limit is filled.
Also, gold serves as a tiebreaker in a tournament when the scores of two
teams are equal. Pick up the scrolls too, they may come in handy later
on. One Firewall scroll can make a difference when facing King Leoric
without Holybolts if you know the double cast technique. Not even those
humble little TP scrolls should go to waste, they serve many useful purposes
( yes, it's legal to go to town as long as you don't interact with the
town folks). The Town Portal section covers some obvious and not so obvious
uses of TP scroll/spell.
Basic
tactics
Note: Occasionally, the word “Shield” is used in reference to
the person who hosted the game. Shield is usually the warrior and host,
though she can be a rogue with weapon/shield setup. The shield’s
job is to hold the monsters at bay so the other members may attack without
getting hit. The shield position may also be a temporary status, for example,
when the warrior is near lvlup with low HP, the rogue takes the shield
position while warrior tags with a bow.
DON’T
be caught dead with Res scrolls in your inventory. Drop all the Resurrection
scrolls by stair as soon as you enter a new level.
DON’T
put Res scrolls on belt! Hehe, bad enough people (mostly me) uses up potions
when typing without hitting the "enter" key first. Try to get
into the habit of clicking on the mouth icon to type.
DON’T
block the doorway! This is one of the major causes of death. You should
not enter a room until the scout gives the signal.
DON’T
change weapon/items in the middle of a battle. You cannot do anything
until the change is completed, and you cannot complete the change when
you get hit and so on...
Choose
one member to be the leader, usually the warrior or ”Shield”.
Follow his lead and stay together. Warrior cracks all barrels and rogue
opens all chest and sarcophagus. Rogue should also run the cursor over
doors and warn if trapped. The mage should feel free to get up and smack
monsters with his staff as long as he is standing next to the warrior,
and can trust him not to retreat or move off without thinking.
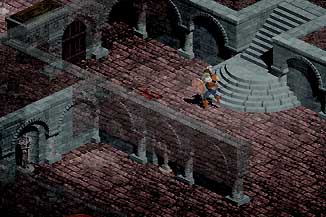
When
entering a new level in the Churches and Hell, no one moves until everyone
is down. You may activate monsters you have to handle by yourself and
get killed, plus no one likes a surprise party when they just enter a
new level. Note: A different tactic is used when entering the Catacombs
and Caves, more on that later.
It’s
now time to introduce you to the first battle formation, “Shotgun”,
in conjunction with what is known as “Set and Bait”. Examine
the immediate dungeon layout and go to the nearest door to setup defense
there (Set), otherwise, the party have no defendable area to retreat to
when overpowered by monsters. The warrior stands on one side of the door
and mage the other; rouge stands a couple of squares back directly inline
with the door. This is the “Rogue Shotgun” formation. One of
the party (I prefer the warrior) goes in the next room and lures (Bait)
a few monsters then fall back into formation. If the rouge baits, she
can position herself at the door inline with the warrior and mage. Other
situation may call for the “Mage Shotgun” formation when the
firepower of the mage is required, especially in the catacombs when Fire
Wall is available. See also the “Slant” formation when defending
a corner door
After clearing the room on the left, the team can use the same door
in reverse, to clear the room on the right |
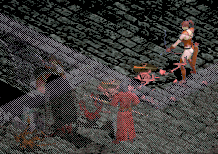
Rogue Shotgun formation |

|